We had some people request the instructions for Mandys 'Dates To Remember' Mini.
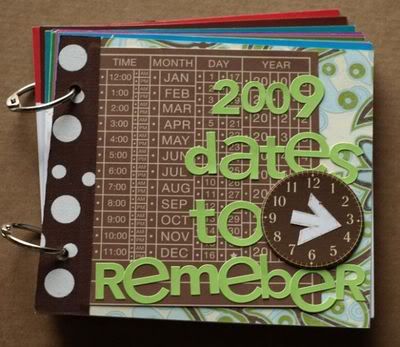
Here they are! And of course, you can see the visuals in her Gallery. There is a limited supply of the mini books in the store. Don't forget to use your Black Friday code to save 25% off your album and supplies. Enter code TURKEY25 until 11/30 to save 25% off your entire order.
Important Dates Minibook How To
When I got the book I measured it and it was an odd size for me so to make it simple I cut it to measure 5 inches from top to bottom and 5.5 inches side to side.
Starting with the covers
1. Cut Patterned Papers of your choice (I used Collage Press) 5inx5.5in adhere to front cover. Cut a coordinating patterned paper to 4 inx4.5 in. Layer it on an angle on the cover. Cut book binding tape 5inx3/4in adhere to left side of cover(this will cover up a little bit of the previous patterned paper's). Add your title with letter stickers. Embellish with some kind of time symbol or life symbol - I used the clock.
Back Cover
Cut Patterned Papaer 5inx5.5in adhere to back cover. Cut a coordinating Patterned Paper to 5inx3in adhere it to the cover(lots of layering). Cut book binding 5inx1in adhere so that you cover up the layered edges of papers. 0nce all is adhered punch holes into the papers for the book rings. This is really easy just flip over and use original book holes as guides.
These are assembly line directions. If you work better doing it differently by all means do it which ever way works best for you. This tends to be a simpler way for some.
Inside
Cut 12 lined or grid papers to 5inx5.5in. Cut patterned paper or sticker borders to 5inches long or 5.5inches wide depending on which side you use you can make them all the same or mix it up a bit like I did.Starting with your Jan lined/grid pp adhere you border and continue this step for all 12 months. Add your important dates with pen,pencil,stamps,stickers whatever you choose. Again do this for all 12 months. Add your photos of people Birthdays,anniversaries,holidays again whatever you choose or you can go with no photos too.I choose to add 1 embellishment that coordinated with the month(ie. Chipboard,stickers,epoxy). You can add more, again its your own style preference. Doodling around photos is another optional thing. If you're not into doodling maybe a sticker border,frame etc. Now its time to adhere the Important Dates lined/grid paper to the backs of the month pages. Easiest way to do this is put your adhesive on the back of the month page rather then the back of the patterned paper. I stacked my months in order, that way they stay in the correct sequence. Start by adhering Jan dates to the back of the front cover. Continue with Feb on the back side of Jan Calendar page and so on and so on till all 12 have been adhered. Using the Month Calendar side as a guide punch holes into the paper. Assemble the mini. The book rings are the easiest even if you end up with something in the wrong spot its easily fixed.
Have fun and enjoy you Important dates minibook. I know I love mine. I'm sure you will love yours too.









2 comments:
I love this calender so many details. Great job.
What an adorable book! Thanks for sharing.
Post a Comment