


This week, we feature a mini book tutorial by June. She worked with the Prima Canvas album. We have ordered more of these as well as the new leather album from Prima so look for these in the store. You can also make your own canvas album by using the canvas squares we sell in the store.
Part 1
Have you tried Prima's line of canvas goodies designed by Donna Downey ? The cover is all canvas. The inside pages of the album measure about 8x8 inches and include canvas and archival-quality clear sheets.
When I first received my album, I just couldn't wait to start working on it. As I started painting each page, things just fell into place. The textures and effects from the paint was just amazing. I had to keep going until all the 20 pages were completed.
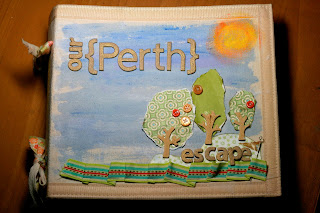
I wanted to create a travel album that conveyed the lush greenery and fun we felt felt when we were in Western Australia. I chose to paint the cover blue to represent the clear blue skies we saw each day. Since the apple trees left a very big impression on us, I made some trees out of some scrap green papers that I had left and sewed some red-ish buttons as apples.
Here are the steps I did to alter the album cover:
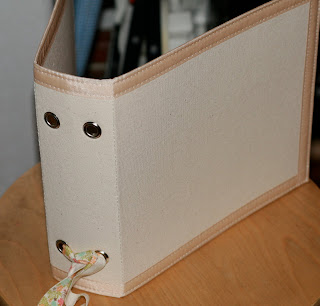
Here is the original cover in beige. I removed all the inside pages before I started painting.
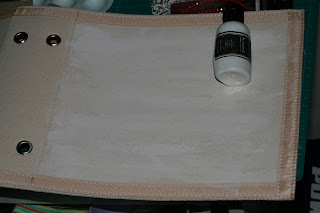
I decided to paint the cover white first so the next layer of colors will start out. I did this for all my inside canvas pages as well as I felt the colors stood out better on a white base. It's just my personal preference.
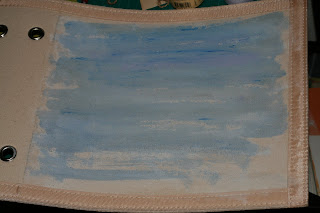
Make sure the base color is completely dried before you paint another layer of color. Next I added a wash of blue paint. I thinned the acrylic paint a little with water as I wanted the some of the white to show through.
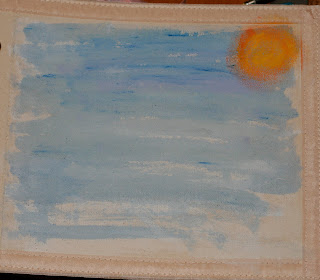
I used a mix of yellow and orange to paint on the bright sun at the corner.
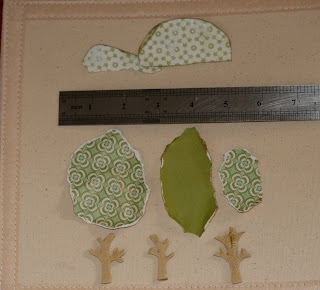
For the trees, I tore oval shapes from several green scraps that I had. The trunks were chipboards from Maya Road which I covered with crakle paint and misted with Maya Mist. I cut out 2 semi circles for the hills from scrap paper as well.
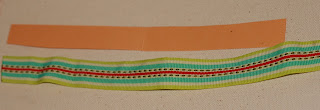
For the grass, this greenish ribbon from Making Memories was just sewn onto a piece of cardstock.
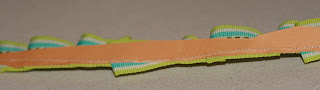
You could also hand sew the ribbon if you do not have a sewing machine, or just glue the ribbon directly onto the cover.
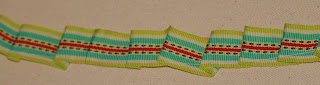

The reason I sewed it on was because I wanted to texture of the folded pleets but I wasn't sure how long i need to hold the birron onto the canvas before the glue bonded it to the canvas so I figured that cardstock would stick on to the canvas much faster. That's what I thought anyway. Please share if you have other ways of attaching the ribbon securely to the canvas.
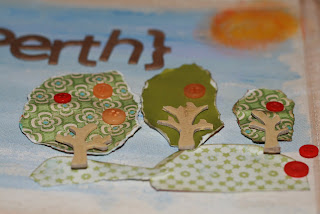
For the apples, I just dropped several red and orange buttons onto the trees and then sewed the button in place.
So now you know how I created my album cover. Watch for the next part of the tutorial on the inside pages.
cheers,
June
When I first received my album, I just couldn't wait to start working on it. As I started painting each page, things just fell into place. The textures and effects from the paint was just amazing. I had to keep going until all the 20 pages were completed.
I wanted to create a travel album that conveyed the lush greenery and fun we felt felt when we were in Western Australia. I chose to paint the cover blue to represent the clear blue skies we saw each day. Since the apple trees left a very big impression on us, I made some trees out of some scrap green papers that I had left and sewed some red-ish buttons as apples.

Here are the steps I did to alter the album cover:

Here is the original cover in beige. I removed all the inside pages before I started painting.

I decided to paint the cover white first so the next layer of colors will start out. I did this for all my inside canvas pages as well as I felt the colors stood out better on a white base. It's just my personal preference.

Make sure the base color is completely dried before you paint another layer of color. Next I added a wash of blue paint. I thinned the acrylic paint a little with water as I wanted the some of the white to show through.

I used a mix of yellow and orange to paint on the bright sun at the corner.

For the trees, I tore oval shapes from several green scraps that I had. The trunks were chipboards from Maya Road which I covered with crakle paint and misted with Maya Mist. I cut out 2 semi circles for the hills from scrap paper as well.

For the grass, this greenish ribbon from Making Memories was just sewn onto a piece of cardstock.

You could also hand sew the ribbon if you do not have a sewing machine, or just glue the ribbon directly onto the cover.


The reason I sewed it on was because I wanted to texture of the folded pleets but I wasn't sure how long i need to hold the birron onto the canvas before the glue bonded it to the canvas so I figured that cardstock would stick on to the canvas much faster. That's what I thought anyway. Please share if you have other ways of attaching the ribbon securely to the canvas.

For the apples, I just dropped several red and orange buttons onto the trees and then sewed the button in place.
So now you know how I created my album cover. Watch for the next part of the tutorial on the inside pages.
cheers,
June


1 comments:
This is cool! Thanks for sharing June!
Post a Comment